| |||
|
||||||||
 Best Porn Sites Best Porn Sites |
Live Sex | Register | FAQ | Search | Today's Posts | Mark Forums Read |
| Forum Help Tutorials and tips. Post any problems or bugs with the forum. |
 |
|
|
Thread Tools |
|
|
#11 |
|
Vacuums suck
 Forum Lord Join Date: Aug 2008
Posts: 1,454
Thanks: 23,139
Thanked 11,806 Times in 1,221 Posts
           |
How to start a New Thread
For this we recommend that you start a thread in "Introductions" as a practice and to gain confidence - we also want you to say hello  . .After, you can read below to learn how to start threads in other sections. Words underlined in Blue - are links (or hyperlink) - in this case to Planetsuzy's homepage - click links and that page will open. Similarly, thumbnails below are links - click on them to see the full-size pictures. Posting an Introduction For this example you are going to create a new thread in "Introductions"; this is the only thread you will start without first searching. New members start introductions threads to announce their membership and tell us a little about themselves. Read a few before starting your own. To start your thread, c\lick on the Introductions link on the Home page:  Mirror Preview Then on the "New Thread" Button  Mirror Preview
 Mirror Preview That's it! - since Introductions threads do not require moderator approval, your thread immediately should appear at top of the Introductions page. If you want to see who adds to it then you can 'subscribe' to the thread. Subscribing to my thread to see who has replied Here is an an example. I would recommend creating your own thread (if you haven't already) and subscribing to it. Click on the 'Thread Tools' at the top and select 'Subscribe to Thread'  Mirror Preview Follow the instructions and you'll be able to see who has said what in your thread. Starting a thread in other sections This is a four part programme and is really quite simple.
1 Which Section First decide in which section you want to create the thread - be careful you don't try to create a new thread in the wrong section for example in the General Discussion Area there are four sections:  Mirror Preview Introductions - you should ALL have a go at creating a thread in here and this is where the example below will be put. General Discussions - Discussions not to do with Porn Sex and Porn Discussions - Adult stuff File and Image Hosts. - what it says in the image above (if you can't see it then click on the image to read). If you wanted to talk about flower arranging then this should go in the General Discussion section if you wanted to talk about flower arranging but using bodily orifices rather than vases to put the flowers in then that ought to go in the Sex and Porn Discussions section. There are other sections in the forum and we would advise that you look through them and their individual rules about what may or may not be posted before you post or start a thread - see below about making mistakes. 2 Has someone already started a thread here? You have decided which section to post in (General Discussions) and want to write about Chimpanzees, for example. Search to see if anyone has already started a thread on Chimpanzees. Got to the General Discussions sections  Mirror Preview Click on "Search this Forum" for the drop down box:  Mirror Preview In the drop down box type the thing you want to search for - in this case "Chimpanzee":  Mirror Preview Look through the results - check out the threads already there:  Mirror Preview If your idea fits into another thread - post a reply to an existing thread - If your thread idea hasn't been started - create your own new thread: 3 Oh Goody - I get to start my own thread. Yes you do - It is the same process that you went through when you started a thread in the Introductions sections but you have do to the research first to see what can and can't be posted. 4 Learning from mistakes and getting help Be prepared to make mistakes.  EVERY poster makes mistakes - even LarryO  - Don't worry if you do make a mistake - you'll probably be contacted by a member of Staff (the ones in Purple, Red or Green) who will help - just take their advice or ask them questions before you post if you are unsure. - Don't worry if you do make a mistake - you'll probably be contacted by a member of Staff (the ones in Purple, Red or Green) who will help - just take their advice or ask them questions before you post if you are unsure. If you have a question about the rules in a specific section that you want to ask before you post then contact that section's moderator(s). To find out who those moderators are look in the bottom right hand corner of the forum section index, for example in the introductions section there are (at the time of writing) only 2 moderators:  Mirror Preview Busier sections like PATM Standard Videos have more:  Mirror Preview Staff are here to help not annoy. Happy posting!  |
|
|
| The Following 81 Users Say Thank You to smallwoodenruler For This Useful Post: | !Jon Snow!, Aaron23062, AbbaZooR, Al COHOOL, Alejonaidas, ams5558, AROmatic, AVAT5, bbkeeley, BCFC_1982, Bigre2Bougre, boatdocster, Bolt666, Booster Gold, cajetillax, chicago, Chulonk, cl3m, Crazy Newbie, DarkGrouse, dfggeyser, dystopia, edd2k, El Gatto Nero, Emo-omE, F3n1x, Fantyhose, frappazappz, Ginger633, H0tzenpl0tz, heartache11, id_877, jiggsbidy, jopon, kaaman, karina808, koecing, koffieboon, K_Yuurei, LarryO, Lemonduck, LiCeK, Little Doctor, luch, luckynator, modenaalicia, mysindra99, nikopalbr, NineTails, nitobe, number__6, piacettomann, pockets, qldldl123, RealAmateur1, RedFox, revwrathline, rpmax, SaintsDecay, sammy1111, santanico, sanung1984, Schavannah, Seawindpel, showmethem, Silvo, SkyLeR, smanlv1, Starshine, Tarkus999, timmodude, u2024, uli12345, UNREDACTED, Valium12, wildwest08, xbeen, yassar, zebop, zeus18, Zyklotron |
|
|
#12 |
|
Devil's Choir
 Postaholic Join Date: Sep 2011
Posts: 9,734
Thanks: 63,471
Thanked 67,945 Times in 9,412 Posts
           |
How To Add A Signature Image
Signature images can be inserted by 2 methods: (1) click 'User CP' on the navigation bar; under 'Settings & Options', click 'Edit Signature'; click 'Browse' to locate a picture on your hard drive; click 'Upload' or; (2) Upload an image to a file host and insert that into your signature. This tutorial explains the second method. For information about signature rules, see: Signature Guidelines thread. 1.] Choose an image host. Before getting started, please read the Allowed Hosts thread being that the image hosts listed there are the only ones you may use. In this tutorial, I will be using ImageBam. The wording and process may vary with other hosts, but it will be very similar. 2.] Upload your image. Select the file you wish to upload. Be sure to mark the image as 'Adult Content'. There is no need to customize the thumbnail. Click 'Upload Now!" 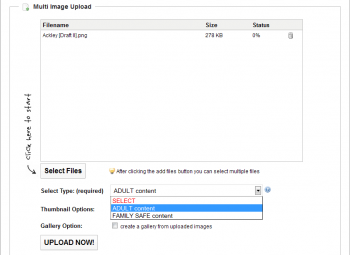  3.] View the full-size image. After the image has successfully been uploaded, you will see a page with codes for thumbnails. Do not copy a code. Instead, click the thumbnail image. You will then be taken to a page with the full-size image. 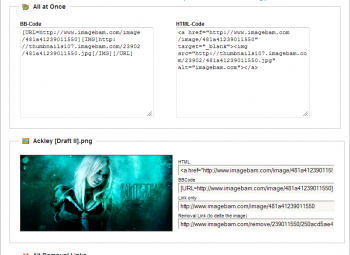 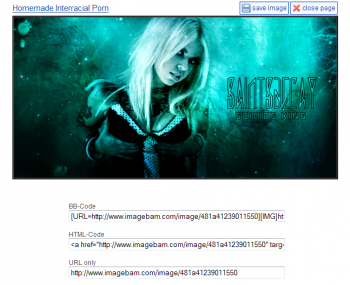 4.] Copy the image URL. Right click over the image and select 'Copy Image Location'. This may vary with different browsers. If you do not see this exact phrase, look for something similar. 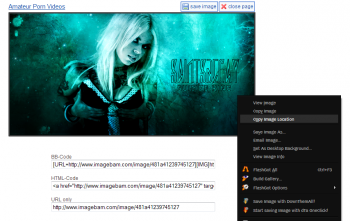 5.] Insert the image into your signature. Now return to PlanetSuzy. Click 'User CP' on your top navigation bar; click 'Edit Signature' under 'Settings and Options'. In the fourth group of editing options above the text box, you will see a square icon with mountains and a yellow sky. Click this box. You will then get a popup dialogue that says 'Please enter the URL of your image'. Right click and click 'Paste' into the text field. Click 'OK'. Your image now has been inserted into your signature with the needed coding. 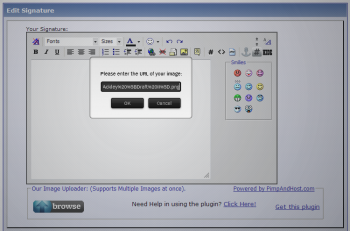 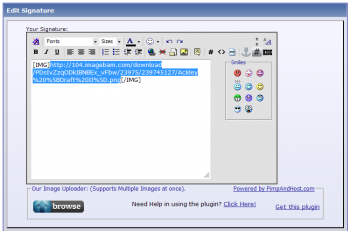 6.] Preview and Save Now scroll down and click 'Preview Signature'. The page will now be reloaded and you can see what your signature will look like. If you are happy with it, scroll down again and click 'Save Signature'. Now the signature picture will be seen at the bottom of new posts. Note, signature images will not appear in prior posts unless you were using a signature at the time of posting.  -SaintsDecay |
|
|
| The Following 85 Users Say Thank You to SaintsDecay For This Useful Post: | !Jon Snow!, Aaron23062, aguynamedJk, Alejonaidas, ardee2x, AROmatic, AVAT5, bbkeeley, BiDA, Bigre2Bougre, boatdocster, Booster Gold, cajetillax, canigou, chicago, Chulonk, Crazy Newbie, DarkGrouse, dfggeyser, dystopia, edd2k, El Gatto Nero, Emo-omE, F3n1x, Fantyhose, frappazappz, GaryLD, Ginger633, heartache11, helllix, herrgunther, id_877, indial, jiggsbidy, JuppJulasch, kaaman, kenito, koecing, ktappinen, kyigorra, K_Yuurei, Ladiesman020, Lando Griffin, LarryO, LiCeK, Little Doctor, luch, luckynator, maceipacovi, meatcutter, MMyersSGP, mysindra99, nikopalbr, NineTails, nitobe, number__6, RealAmateur1, RedFox, rpmax, sammy1111, santanico, sanung1984, Seawindpel, showmethem, Silvo, SkyLeR, smallwoodenruler, smanlv1, Smut Peddler, SniperT6, soleofsoul, supermonk, Teenmushi, timmodude, Toto, Treeant34, u2024, uli12345, vasisa, wakeandblake, wildwest08, xbeen, Yambeat, Z.E.V.S.I.K.A, Zyklotron |
|
|
#13 |
|
Super Moderator
 Clinically Insane Join Date: Jan 2007
Posts: 4,457
Thanks: 4,039
Thanked 22,333 Times in 2,274 Posts
           |
If you wanna obtain the information of your vids to include them in a post and obtain a result like this:
Last edited by Qwerty987; 31st May 2020 at 23:36.
Reason: Adding a new template
My vid.avi; 695 MiB; 00:58:05.816; XviD; 1 531 Kbps; 624 x 352 ; MPEG-1 Audio layer 3 ; 128 Kbps 2 channels; 48.0 KHz Download and install mediainfo (mediaarea.net/en/MediaInfo) and use the following template. Code:
General;"%FileName%.%FileExtension%; %FileSize/String3%; %PlayTime/String3%; " Video;"%Codec/String%; %BitRate/String%; %Width% x %Height% ; " Audio;" %Codec/String%$if(%BitRate%, ; %BitRate/String%) %Channel(s)/String%; %SamplingRate/String% $if(%Language%,Language : %Language%\r\n)\r\n" Text;Text #%StreamKindID% : %Codec/String%\r\n$if(%Language%,Language : %Language%\r\n)\r\n Chapters;Chapters #%StreamKindID% : %Total% chapters\r\n\r\n Code:
General;"\[B\]General:\[/B\] %FileName%.%FileExtension%; %FileSize/String2%; %OverallBitRate/String%; %Duration/String3% \r\n" Video;"\[B\]Video:\[/B\] %CodecID% $if(%BitRate%, @ %BitRate/String% %BitRate_Mode%); %Width% x %Height% (%DisplayAspectRatio/String%); %Duration/String3%; %FrameRate% fps; %StreamSize/String%\r\n" Audio;"\[B\]Audio #%StreamKindID%:\[/B\] %Format/String% $if(%BitRate%, at %BitRate/String%); %Channel(s)/String%, %SamplingRate/String% $if(%Language%,Language: %Language%) %StreamSize/String%\r\n" Text;Text #%StreamKindID% : %Codec/String% $if(%Language%,Language : %Language%\r\n)\r\n Chapters;Chapters #%StreamKindID% : %Total% chapters\r\n\r\n Then open Mediainfo, go to option->preferences->Custom->Choose your desired custom test and select the file you have saved previously. |
|
|
| The Following 23 Users Say Thank You to Qwerty987 For This Useful Post: |
|
|
#14 |
|
Super Moderator
 Clinically Insane Join Date: Jan 2007
Posts: 4,457
Thanks: 4,039
Thanked 22,333 Times in 2,274 Posts
           |
To arragne thumbnails horizontally you must remove manual return lines between thumbnails (thus, the code between pictures is "[/.URL][UR.L]", I've added dots in the code to make it visible).
You will require a text editor like notepad-plus-plus (free program for windows). (doesn't work in windows notepad) STEPS. - Upload all the pictures to your thumbnail host. - Copy the text code of all the files provided by your host to notepad++. - Select the text of all the links - Open the replace dialog (control+H) or search->replace. - Put "\r\n" (whitout the quotes) in the field "Find what" - Leave blanck the field "Replace with" - Tick the "In selection" option. - In search mode tick "extended" option. - Press the "replace all" button. Here's a capture in notepad++ of a 7 lines text with 2 thumbnails per line.  In the above example you finish with one line only to copy in your post. The 14 thumbnails are in one line.  You can do similar tricks using other text editor or word processor, although the instructions may differ. |
|
|
| The Following 35 Users Say Thank You to Qwerty987 For This Useful Post: | Aaron23062, AROmatic, AVAT5, boatdocster, chicago, DarkGrouse, dfggeyser, DoctorNo, dodoes, dystopia, El Gatto Nero, Emo-omE, Fantyhose, Ginger633, Gwynd, heartache11, id_877, jiggsbidy, K_Yuurei, Ladiesman020, LarryO, Little Doctor, luch, luckynator, nitobe, qldldl123, rpmax, showmethem, Silvo, smallwoodenruler, teensex, u2024, UNREDACTED, wildwest08, Z.E.V.S.I.K.A |
|
|
#15 |
|
Super Moderator
 Clinically Insane Join Date: Jan 2007
Posts: 4,457
Thanks: 4,039
Thanked 22,333 Times in 2,274 Posts
           |
movie thumbnailer (mtn) it's a command line program to do batch captures from vids, but has a graphical user interface (GUI) that makes easier the creation of thumbnails. The configuration and creation of the thumbnails takes less than a minute.
Last edited by Qwerty987; 20th July 2021 at 20:49.
Reason: Update links
Firstly you will need to download moviethumbnailer form their web. Current active release Original site (deprecated, no longer updated) Scroll down to Download and installation and download - mtn Windows binary & dll files & source code. - The GUI Movie 'Batch' Thumbnailer FrontEnd: version 0.1 developed by illuminati (the you can try the other GUI), but this is easier to use.  Once downloaded, uncompress the "mtn Windows binary" and then put the file from the GUI (mtnBatch.v0.1.exe) in the same folder.  CONFIGURATION OF THE GUI. 1 - Open mtnBatch.v0.1.exe and go to the Filetypes tab First step - Below executable file, browse to indicate were is the executable file (In this case "D:\mtn-200808a-win32\mtn.exe"). You only need to do this once.2 - Go to the Settings tabs. Here you can manage the appareance of the captures. The most important things are the number of frames, the with of the picture and the info provided. The number of frames is determined by the number or columns and rows. If you wanna set the captures at a period of time, you must set the number of rows at 0 and the time step at the length you wanna do it (between 15 seconds and 5 minutes).The configuration setting are stored in a text files mtnbatch.ini whic can be edited with notepad. CREATION OF THE CAPTURES 1 - Open mtnBatch.v0.1.exe and go to the Files/Folder tab. 2 - Drag and drop the files or folder you wanna captures (if some files doesn't appear be sure you have included their extension in the settings) if the extension is included and the file doesn't appear, probably has some problem. 3 - Once the files are loaded, click on generate, you will see the progress bar of the process 4 - To see the preview, click over the name of the file (otherwise it won't appear ).   TIPS For a quick access do a direct access to the mtnBatch.v0.1.exe in your desktop or when the GUI is open stick it in your task bar. Check the integrity of your video file if the capture or the info doesn't appear properly. Most of the times are defective (some part is missing or the index of the video is corrupted). |
|
|
| The Following 38 Users Say Thank You to Qwerty987 For This Useful Post: | Aaron23062, AROmatic, AVAT5, Bigre2Bougre, boatdocster, chicago, DarkGrouse, DoctorNo, DoomRider, dystopia, El Gatto Nero, Emo-omE, Fantyhose, fioiodenar, Ginger633, heartache11, id_877, jiggsbidy, Ladiesman020, LarryO, Little Doctor, luch, luckynator, nitobe, orwellian, porngalaxy, qldldl123, Romano, rpmax, sammy1111, showmethem, Silvo, smallwoodenruler, u2024, UNREDACTED, Valium12, wildwest08, Z.E.V.S.I.K.A |
|
|
#16 |
|
Sorceress
 Beyond Redemption Join Date: May 2008
Location: Where the Wild Things Are
Posts: 13,293
Thanks: 112,414
Thanked 109,665 Times in 11,756 Posts
           |
A tool is available in several forum sections to "hide" your links; hopefully this will help reduce the number of links reported and killed.
To use the "hide" tool, wrap [ hide ] and [ /hide ] around the part of your post that you want to hide (remove the spaces before and after the words "hide"). Links wrapped in [ hide ] only will become visible to members clicking "Thanks" for the post. Posting a reply will not show the links. For example: - Use [ hide ] only around download links, not for pictures or unrelated materials. - Include the host name of links in your posts when using [ hide ] so members will know what they will get after clicking "Thanks". - PLEASE NOTE: if you CAN NOT CLICK "Thanks", such as with Guests Members, you will NOT have access to hidden links. - Using [ hide ] is optional. Contact a moderator if you have any questions. . |
|
|
| The Following 39 Users Say Thank You to wildwest08 For This Useful Post: | Aaron23062, anonzie, AVAT5, bbkeeley, Bigre2Bougre, boatdocster, byl93, chicago, dfggeyser, dinosauro, DoctorNo, dystopia, El Gatto Nero, gant83, Ginger633, GuidoPestoni, Gwynd, jiggsbidy, kashmir772, LarryO, Little Doctor, luch, nitobe, persian_prince, phoniex2, qldldl123, rexsession, riic, rpmax, Tarkus999, Toto, u2024, UNREDACTED, Valium12, vidhusri, Xanderian, xlr8tx, Z.E.V.S.I.K.A, zabeerde |
|
|
#17 |
|
Re-Pronerator
 Clinically Insane Join Date: Dec 2009
Location: The forest through the trees
Posts: 3,934
Thanks: 52,229
Thanked 30,305 Times in 3,555 Posts
           |
How to properly use image hosts to import the correct image code to your post
Last edited by ww2flyer; 21st August 2024 at 22:42.
Reason: add picstate, postimages directions
When posting images, please use the BB Code that all the image hosts provide. Find your allowed image host below, and follow the directions to get the proper BB Code to post a thumbnail image. depic.me / dpic.me - require free registration For this host, click on "browse" to choose the image(s) to upload. Enter a thumbnail size in the "thumbnail size" box, and click "upload". Recommended size is 300 - that way your thumbnail isn't going to violate the size rules. After upload, click the "forum code tab. Copy the text that appears in the box right below that, and paste that text into the post. 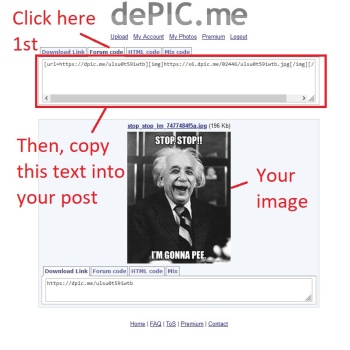 imagebam.com When posting images, please use the BB Code that all the image hosts provide. For this host, click on "add files" to choose the image(s) to upload. Select the type with the radio button, then, especially if you have a large image, select a size from the dropdown "thumbnail options". Recommended size is 320x240 for large images - that way your thumbnail isn't going to violate the size rules. Hit "upload now". After upload, copy the text in the BB-Code box, and paste that instead of the direct link into the post. 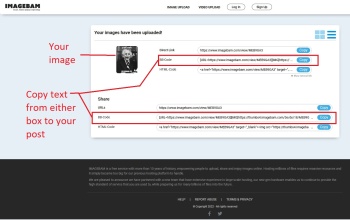 imgcredit.xyz - requires free registration For this host, select "upload images" and then click on "not safe family upload" button if NSFW content. Note no onlyfans content allowed. Once uploaded, select "bb code medium linked" (recommended) from the dropdown "embed codes". Then copy and paste the text in the box below that instead of the direct link into the post.  imagetwist.com, excluding vipr.im and phun.imagetwist.com - requires free registration. When posting images, please use the BB Code that all the image hosts provide. For this host, select "single upload" or "multi upload" and then click on "browse" to choose your image(s). Select thumbnail size from the dropdown. Recommended size is 300X300 or 350x350. After upload, select the little </> icon for seeing embed codes, and choose BB or, right after you upload, you can select "copy" on the "Thumbnail BBCode (Forums):" area. Then paste that instead of the direct link into the post. 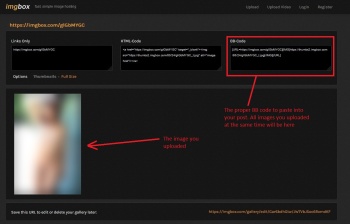 imagevenue.com When posting images, please use the BB Code that all the image hosts provide. For this host, click in the "Drop files to upload (or click)" field and navigate to the image(s) you want to upload. Then, select "type" and "thumbnail size" from dropdown menus. Recommended size is 300x300. Hit "upload". After upload, copy the text in the BB-code box, and paste that instead of the direct link into the post. 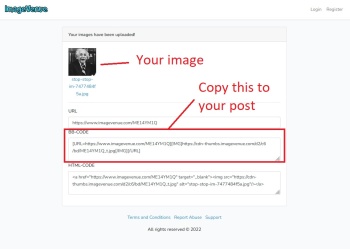 imgbox.com (recommended for covers and full size images) When posting images, please use the BB Code that all the image hosts provide. For this host, select "upload images" and navigate to the image(s) you want to upload. Then, select "content type" and "thumbnail" from dropdown menus. Recommended size is 300x300 or 350x350 resized. Hit "start upload". After upload, copy the text in the BB-code box, and paste that instead of the direct link into the post. 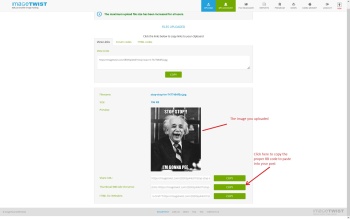 picstate.com - requires free registration After login, you will see a screen for your documents. There is a green "Upload files into this folder" button with a default location which should be fine. Click it, and the "select files" page will open. Choose thumbnails size from the drop down (300 is the max for free users - that's just fine for PS), and then add files with the "add files" button in the box (see below). Once you have chosen files, hit the green "upload" button, and the file(s) will upload and you will get another page. Choose BBCode Thumb from the "All codes" box and copy the codes, or copy the BBCode Thumbnail from the "Single Pic" portion of the page. Paste that into your post. 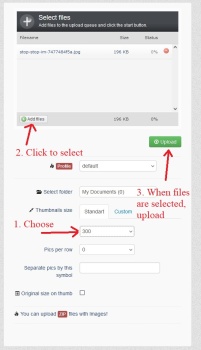 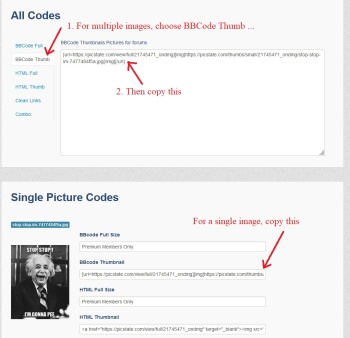 pimpandhost.com When posting images, please use the BB Code that all the image hosts provide. For this host, click on "upload files" and navigate to the image(s) you want to upload. After upload, click the little  above the pictures to get the embed codes for the image. Click on the BB Code box, and choose the size. Recommended size is small or medium. Copy the text in the BB code box, and paste that instead of the direct link into the post. above the pictures to get the embed codes for the image. Click on the BB Code box, and choose the size. Recommended size is small or medium. Copy the text in the BB code box, and paste that instead of the direct link into the post.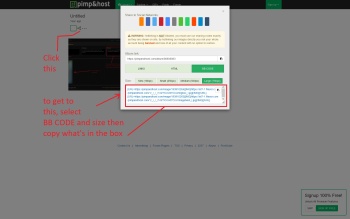 pixhost.to When posting images, please use the BB Code that all the image hosts provide. For this host, click on "add files" to choose the image(s) to upload. Select the type with the radio button. In "settings" you can choose the maximum size of the thumbnail. Recommended size for large images is no more than 350. Hit "start upload". After upload, click in the "forum thumbnail" box to automatically copy the BB-Code, and paste that instead of the direct link into the post.  pixroute.com - requires free registration When posting images, please use the BB Code that all the image hosts provide. For this host, click on "browse files" to choose the image(s) to upload. Choose a thumbnail size from the dropdown "thumbnail size". Recommended size is 300x300 for large images - that way your thumbnail isn't going to violate the size rules. Click "start upload". After upload, click the "code for forums" tab. Copy the text that appears in the box right below that, and paste that text into the post. 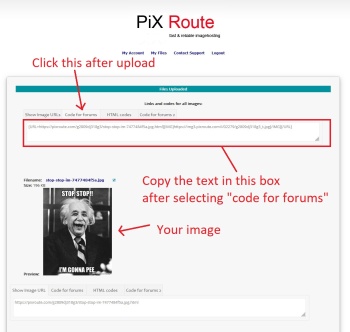 postimages.org / postimg.cc / pixxxels.cc For this host, the easiest route is to go to the site, leave the defaults ("Do not resize my image" and "No expiration"), and click the "Choose images" link. Select the images you want to upload from your file, hit "open", and the images will load. Then, choose "Thumbnail for forums" link for a single image upload or choose "Thumbnail for forums" from the "Codes for all images" dropdown, and codes will show in the box below. Copy those codes, and paste them into your post. See below for single image and multiple image screenshots. single 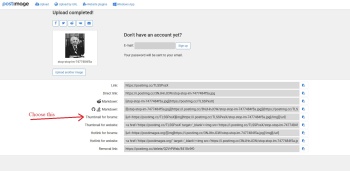 multi 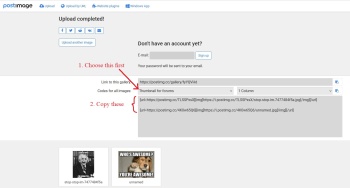 turboimagehost.com For this host, "select files" to upload, choose "image(s) content" from dropdown, and choose "thumbnail size" either by entering, or using slider. Recommended size is 300x300 or 350x350 for large images - that way your thumbnail isn't going to violate the size rules. Click "upload image(s)". Copy the text in the "clickable thumbnail for forums" box and paste that instead of the direct link into the post.  uploadhouse.com For this host, click on "browse" to choose the image(s) to upload. Then, especially if you have a large image, choose a size from the dropdown "resize images". Recommended size is 320x240 for large images - that way your thumbnail isn't going to violate the size rules. After upload, copy the text in the BB Code box, and paste that instead of the direct link into the post. 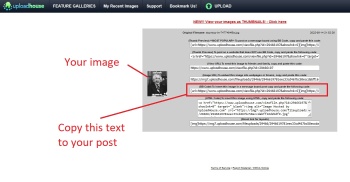 |
|
|
 |
| Thread Tools | |
|
|