| |||
|
||||||||
 Best Porn Sites Best Porn Sites |
Live Sex | Register | FAQ | Search | Today's Posts | Mark Forums Read |
| Graphics and Wallpapers Discuss and share graphics, wallpapers and signatures. |
 |
|
|
Thread Tools |
|
|
#1 |
|
Registered User
Addicted Join Date: Jun 2008
Location: Mexico & Around my mind
Posts: 222
Thanks: 269
Thanked 1,097 Times in 136 Posts
           |
Here I have you a quick tutorial for extracting thing form a photo, image, etc.
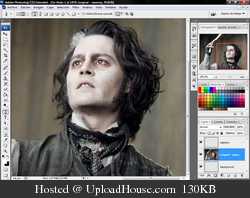
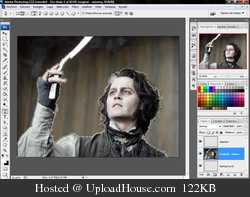
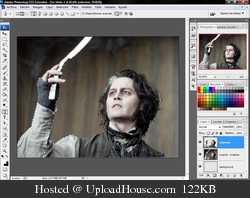
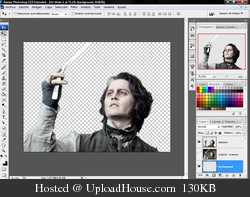
Using the pen tool: Here I have you a quick tutorial for extracting thing form a photo, image, etc. Using the pen tool: Ok lets open any image (yes, usually we all pick naked ladies, but here Im using one of Johnny Deep, lol). Make sure to leave the image as the original now open a new layer I will rename it selection. Lets go to the tricky part. Choose de selection tool with the property of strokes. If you want zoom the image to have a better view of the pixels and start selecting:  Go ahead, the peen tool is very difficult to dominate. So keep practicing!. Take your tame, zoom all you want. this is my result:  Then select the clean layer named selection (we still have the pen tool selected) right click and in the window data appears select make selection and.  voala! voala! With your selection now go to image>apply image:  Its all practice until you have a perfect rendering (yes, Im not to good):  kisses form mexico!!!!
__________________
Last edited by Voxifervs; 26th October 2008 at 01:47.
Reason: special characters trouble
I'm a Snow Leopard Grrrrrrrrr!!!
|
|
|

|
|
|
|
|
#2 |
|
Registered User
Addicted Join Date: Jun 2008
Location: Mexico & Around my mind
Posts: 222
Thanks: 269
Thanked 1,097 Times in 136 Posts
           |
New tutorial people.
Give some feedback to this one, i spend a lot of time making it: the result:  the tutorial:  http://img8.uploadhouse.com/fileuplo...7e4f9f2bda.jpg
__________________
I'm a Snow Leopard Grrrrrrrrr!!!
|
|
|

|
| The Following 16 Users Say Thank You to Voxifervs For This Useful Post: | ANot, cylnz, digitech, Dracula, ijerkoff, JaydenJames, LarryO, maxhitman, Pawli, rpmax, Salice, SavageWolf, SimpleJackson, Toto, trackstar8, Vunk |
|
|
#3 |
|
Registered User
Novice
Join Date: Nov 2009
Location: Antarctica
Posts: 82
Thanks: 1,893
Thanked 118 Times in 34 Posts
          |
For real power sigs and tutorials on making them - Try Paint
(Do a Google search) its Freeware and has an in-depth support forum and hundreds of tutorials. Paint.Net was Microsoft funded - it also has layers and hundreds of effects and more down loadable. I use it at work cos the bastards are too cheap to buy Photoshop! |
|
|

|
| The Following 4 Users Say Thank You to archie.lukas For This Useful Post: |
|
|
#4 |
 Addicted Join Date: Jul 2014
Location: In my Dreams
Posts: 892
Thanks: 10,432
Thanked 5,091 Times in 854 Posts
           |
 If you have some resources and you wanna share with us post here.  1. Some Textures :  Download Link : Dead Link Removed |
|
|

|
| The Following 3 Users Say Thank You to edd2k For This Useful Post: |
|
|
#5 |
 Addicted Join Date: Jul 2014
Location: In my Dreams
Posts: 892
Thanks: 10,432
Thanked 5,091 Times in 854 Posts
           |
Some fonts from my collection
Last edited by edd2k; 27th July 2014 at 19:50.
 3000+ 3000+ Download link: Dead Link Removed Pass: just4 ~Have Fun . |
|
|

|
| The Following 3 Users Say Thank You to edd2k For This Useful Post: |
|
|
#6 |
 Addicted Join Date: Jul 2014
Location: In my Dreams
Posts: 892
Thanks: 10,432
Thanked 5,091 Times in 854 Posts
           |
Textures Pack V2
Download: Dead Link Removed Pass: tpain |
|
|

|
| The Following 3 Users Say Thank You to edd2k For This Useful Post: |
|
|
#7 | |
|
Lamenting Sativa Rose
 Postaholic Join Date: May 2012
Location: Between Sativa's lips...
Posts: 7,894
Thanks: 14,314
Thanked 13,064 Times in 2,738 Posts
           |
Quote:
 ). There are far more talented people on Planetsuzy than I am. PS is a powerful tool and usually there's about 5 different ways of doing just about everything. This is enough to make your head spin. The better part of 20 years later, and I'm still learning. ). There are far more talented people on Planetsuzy than I am. PS is a powerful tool and usually there's about 5 different ways of doing just about everything. This is enough to make your head spin. The better part of 20 years later, and I'm still learning. A couple general tips:
Overall your efforts aren't bad, but let's dig deeper. Now depending on the level of realism you're going for, I see a few things that catch my eye. The color / tonality and darkness / lightness are mixed up in the wall quoted above. Here's what I mean; When it comes to perspective, closer objects will appear darker while objects further away will appear lighter. This can be corrected by color matching using a curves adjustment. Here's a good video for that: Color can also be "washed out" by too much lighting. Other adjustments such as Vibrance and/or Levels can be handy tools also. It's tempting to jam ALL the sexiness into one wallpaper with 7 or more subjects, but this wall below is a little overkill: It looks too "busy" in my opinion. Sometimes less is more. Sometime simpler is better. The last thing that really sticks out like a sore thumb to me is your cut outs (extractions). I don't know what methods you're using or what version of PS you're using, but new PS has come a long way with automatically selecting a subject (so you can remove the background). It does a pretty good job and you can always fine tune a layer mask afterwards. There are tons of tutorials on this. I've highlighted a few (but not all) of the areas that look wonky AKA the edges aren't clean. At the end of the day, if you're happy with the result, that's really all that matters. Please don't take any offense in what I said. I'm only offering help. I deleted my first wallpapers from back in the day. Good thing, because I would be ashamed to show them to anyone. However, your efforts are much better than my first efforts. Keep up the good work and never stop learning. 
__________________
Want some decent wallpapers? Click the signature below.
  RIP Tootsie22 - 3-11-19 - Gone but not forgotten |
|
|
|

|
| The Following 4 Users Say Thank You to ViceLikeEye For This Useful Post: |
|
|
#8 |
|
V.I.P.
 Clinically Insane Join Date: Apr 2017
Location: Gilligan's Island
Posts: 4,795
Thanks: 15,133
Thanked 21,991 Times in 4,460 Posts
           |
Great info and great wallpapers ViceLikeEye !
 I like your style ! I like your style ! I have also been banging on this Photoshop gizmo since 1997 and I am still learning new tricks everyday ! It´s just SO MUCH FUN ... specially when working with sexy lady pics  Cheers
__________________
 |
|
|

|
| The Following 4 Users Say Thank You to maxhitman For This Useful Post: |
|
|
#9 |
|
We all need something to live for...
Forum Lord Join Date: Jan 2019
Location: Greatness from Small Beginnings
Posts: 1,240
Thanks: 352
Thanked 9,803 Times in 928 Posts
           |
not to butt in but...I was trying to replace the backgrounds of some walls and watched and tried to mimic this vid but @ about 1:00 he loses me...Im trying tommake up the diffence of hair or the white spots that remain and when o follow his lead the thing just paints black over the photo instead of touching up...he says thats the miracle of blend mode but when I put it in blend mode everything either diappears or it just wont blen AND his modes all say normal to begin w/ am I not clicking on something? just trying to blend the white parts w/ the background for a more natural look! thnx
|
|
|

|
| The Following 5 Users Say Thank You to MasterBates For This Useful Post: |
|
|
#10 | |
|
V.I.P.
 Clinically Insane Join Date: Apr 2017
Location: Gilligan's Island
Posts: 4,795
Thanks: 15,133
Thanked 21,991 Times in 4,460 Posts
           |
My apologies to ViceLikeEye for posting this.
Maybe we should open up a new thread with just "Photoshop tutorials and Tips & Tricks" (?) - I will ask a moderator if its possible. Quote:
"work perfectly" when removing an ALL WHITE background. It is so much easier for the PSD program to remove solid one-colored backgrounds, rather than photos which have a much more complicated (with many colors) and more detailed background scenes. It is also possible, but a little more time consuming. You have to go through diferent processes/steps to achive a good result. Here is a tutorial which explains better the "more complicated and tedious work, it is to remove a girl´s image from a background which does not have a solid one-color ... Code:
http://psdstack.com/photoshop-tutorials/basic/remove-background-photoshop/
__________________
Last edited by maxhitman; 1st November 2022 at 23:26.
Reason: fix
 |
|
|
|

|
| The Following 5 Users Say Thank You to maxhitman For This Useful Post: |
 |
| Thread Tools | |
|
|