|
|
| ||
|
 |
|||||||
 Best Porn Sites Best Porn Sites |
Register | FAQ | Search | Today's Posts | Mark Forums Read |
| Graphics and Wallpapers Discuss and share graphics, wallpapers and signatures. |
 |
|
|
Thread Tools |
 9th October 2008, 22:28
|
#1 |
|
Lady V / Grrrrr
Addicted Join Date: Jun 2008
Location: Mexico & Around my mind
Posts: 253
Thanks: 269
Thanked 1,092 Times in 136 Posts
  |
Ok
As you know we have the Planet suzy signature of the week. And Fresno has already post a tutorial to make your own sig in paint. http://veterperementour.ru/t89932-you-can...-your-sig.html So I like to put one but with photoshop: First we open photoshop (i'm working with the Cs3 in spanish version. Sorry for mistakes in the translation and if you are in a older photoshop version 'cs, or cs2' there's no big diference, so don't worry) Knowing all this, lets open a new 500x100 pixeles file. The first thing you sould have in mind is what is your idea of the sign. What would you put on it? what colors? what render? I will going to work with a render of a girl in blue clothes and a blue abstract background. So i will fill the transparent leyer with black(cause i like black and blue):  Next i will put the render. (You can rotate, change high, weight, disort, warp, etc. The render with the transform tool > ctrl + T):  The next step is a tricky one. We are going to duplicate this original render tree times. Leaving two copies under the original and one above it. Then select the finger tool and pres F5. "Welcome to de brush window" select your pre-establish brushes. And look for the "star flow" brush:  ok. Notice that there's a lot to do and explore in this brush window. I will tell you to leave that brush as a preset and work with it in this tutorial. But you can make combinations, play, an combine the diferent brush properties to get cool results. Specialy with this finger tool. So we select the first copy (the one at bottom) and make some strokes at the left top of the original render:  Know select the second coy and make again strokes but at the right bottom:  Know select the third copy (the one at the top) and change it's blending mode to overley:  This is how the leyers have to be ordered:  The next step is to create a new layer and put it below this all girl renders and copies. Know select the brush tool, choose any color that fits with your render (blue in my case) and make some strokes with an abstract brush (there are a lot of brushes in internet, i leave you the ones i use in the rar file at the end of this tutorial.):  Next step is to create a new layer go to image>apply image. Then go to filter > disort > ocean waves. Play with the preference of the filter until you have something nice. You will have to erase some parts of that leyer so your original render dont looks ugly, and leave this layer in blending mode lighten:  After that create a new lager go to image > apply image, again. Know go to filter > blur > gaussian blur. Make sure to give the filter a radius between 1 and 2. Click OK and leave this leyer in blending mode linear dodge. (if you don't like the result you can change the opacity or try another blending mode, go ahead experiment a little bit). I change the opacity to 74% and erased the part of the face:  Al right this is the stright away. Make some gradient maps and color balance, in the adjustment layers panel. (This is experimenting with colors, opacity and blending modes only. Choose the colors and blending modes that fits the best in your sign. I put a psd file with all the leyers i used in the rar file below so get a look, and experiment yourself):  At last put your nickname and a marc("marco" in spanish, i don't know if the translation is ok) if you want:  -psd file(open with photoshop) + abstract brushes: HTML Code:
http://***************/files/152372752/tuto_by_voxifervs.rar
__________________
Last edited by Voxifervs; 9th October 2008 at 22:38.
I'm a Snow Leopard Grrrrrrrrr!!!
|

|

|
| The Following 29 Users Say Thank You to Voxifervs For This Useful Post: | 213crz, ANot, bendames, cLouxXx, Credwiz, DaLk, Dracula, Fresno, HawkeyeBerlin, ijerkoff, koecing, magergxd, mobifcuk, MrsABC, Paloopa, Pawli, Reclaimedm1, S3R14L, Sakuramania, Salice, SimpleJackson, Slimmy Jimmy, soplangi, SpikeBighorn, starterman, supermonk, Thud, Vunk, xC0DE |
|
|
|
9th October 2008, 22:29
|
#2 |
|
Junior Member
Newbie Join Date: Oct 2008
Posts: 26
Thanks: 6
Thanked 37 Times in 13 Posts
|
nice, but i dont have photoshop but i like to use GIMP, but anyways, nice work
|
|
|
|
| The Following 6 Users Say Thank You to pornomaniac2112 For This Useful Post: |
|
9th October 2008, 22:40
|
#3 |
|
Super Poster / Sig Maker
Forum Lord Join Date: Oct 2008
Location: Fresno, CA
Posts: 1,730
Thanks: 373
Thanked 525 Times in 259 Posts
|
I use Photoshop CS2 and Adobe ImageReady CS2
If you don't have Photoshop you can use paint http://veterperementour.ru/showthread.php...439#post462439 |
|
|
|
| The Following 4 Users Say Thank You to Fresno For This Useful Post: |
|
26th October 2008, 01:40
|
#4 |
|
Lady V / Grrrrr
Addicted Join Date: Jun 2008
Location: Mexico & Around my mind
Posts: 253
Thanks: 269
Thanked 1,092 Times in 136 Posts
|
Here I have you a quick tutorial for extracting thing form a photo, image, etc.
Using the pen tool: Here I have you a quick tutorial for extracting thing form a photo, image, etc. Using the pen tool: Ok lets open any image (yes, usually we all pick naked ladies, but here Im using one of Johnny Deep, lol). Make sure to leave the image as the original now open a new layer I will rename it selection. Lets go to the tricky part. Choose de selection tool with the property of strokes. If you want zoom the image to have a better view of the pixels and start selecting: 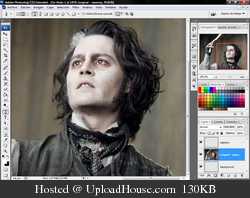 Go ahead, the peen tool is very difficult to dominate. So keep practicing!. Take your tame, zoom all you want. this is my result: 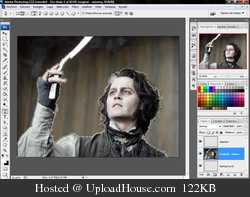 Then select the clean layer named selection (we still have the pen tool selected) right click and in the window data appears select make selection and.  voala! voala! With your selection now go to image>apply image: 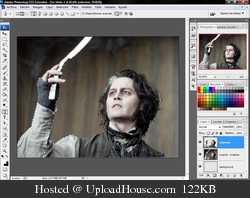 Its all practice until you have a perfect rendering (yes, Im not to good): 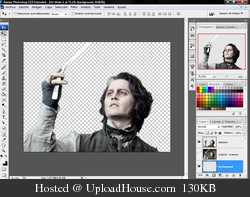 kisses form mexico!!!!
__________________
Last edited by Voxifervs; 26th October 2008 at 01:47.
Reason: special characters trouble
I'm a Snow Leopard Grrrrrrrrr!!!
|
|
|
|
| The Following 8 Users Say Thank You to Voxifervs For This Useful Post: |
|
12th January 2009, 23:48
|
#5 |
|
Lady V / Grrrrr
Addicted Join Date: Jun 2008
Location: Mexico & Around my mind
Posts: 253
Thanks: 269
Thanked 1,092 Times in 136 Posts
|
This is the tutorial for this sign:
 First open a new file 500x100:  Next we put the principal render in the middle:  Now make some strokes in a new layer behind the girl render:  To make them just make some strokes in white then go to filter>distort>ripple>small ripples. Create a new layer and with a soft brush cover the ripples in any color you want (notice that this layer is behind of the principal render:  now change the blending mode of this layer to soft light notice the change:  for the next step create a new layer now make strokes with a cool brush.  Dont forget to go to the brushes window to change some configurations of the brushes (notice that we make this preliminary strokes in white and in the back of the girl render):  In a new layer make again strokes with the same brush in a different color. For this trick use light colors and try to make a pattern around the render:  now change the blending mode of this layer to soft light  more strokes in white in a new layer. (around the internet are a lot of pages with brushes for Photoshop make a little google search and you will find very cool ones)  In a new layer make strokes with a soft brush, play with the colors combine them and explore all of your creativity to make a good color arrange:  Next change the blending mode to this colors layer to soft light  To make a better arrange I will make another small ripple of a white strokes in front of my girl render:  I also color it in a new layer (notice that I am now working in front of the girl render so I make easy strokes in pink that doesnt affect my render)  That layer in soft light mode:  this is a fancy one create a new layer go to image>apply image. Now go to filter>blur>Gaussian blur. In radius make sure not to go over 1.5. With the filter effect in the layer change the blending mode to screen lower the opacity and erase some parts of the layer. You will see that I erased the parts of the face and the body:  now just play with the overall colors go to adjustment layer>color balance. Play with the balances, the blending modes, the opacity and with more color balances. My result is this:  create a new layer with a soft brush in color black. Darken the edges of the image:  Finallly we put our nickname and a border:
__________________
I'm a Snow Leopard Grrrrrrrrr!!!
|
|
|
|
| The Following 10 Users Say Thank You to Voxifervs For This Useful Post: |
|
17th March 2009, 04:28
|
#6 |
|
Lady V / Grrrrr
Addicted Join Date: Jun 2008
Location: Mexico & Around my mind
Posts: 253
Thanks: 269
Thanked 1,092 Times in 136 Posts
|
New tutorial people.
Give some feedback to this one, i spend a lot of time making it: the result:  the tutorial:  http://img8.uploadhouse.com/fileuplo...7e4f9f2bda.jpg
__________________
I'm a Snow Leopard Grrrrrrrrr!!!
|
|
|
|
| The Following 14 Users Say Thank You to Voxifervs For This Useful Post: | ANot, digitech, Dracula, ijerkoff, JaydenJames, LarryO, Pawli, rpmax, Salice, SavageWolf, SimpleJackson, Toto, trackstar8, Vunk |
|
24th October 2009, 17:57
|
#8 |
|
Virgin Join Date: Jul 2008
Posts: 16
Thanks: 404
Thanked 7 Times in 4 Posts
|
For me as well as a large number of others, I believe, the problem isn't so much how to make a sig BUT how to get their hands on a non-virus/Trojan Photoshop/CS. Right?
   Honestly - who can say they actually bought it!? I am actually considering doing just that...lotta money but...  PS: Good tutorial, man...  |
|
|
|
| The Following User Says Thank You to ThnaXXX For This Useful Post: |
|
27th November 2009, 22:34
|
#9 |
|
V.I.P.
 Clinically Insane Join Date: Apr 2008
Posts: 2,037
Thanks: 3,010
Thanked 73,529 Times in 5,244 Posts
|
Dear Voxifervs,
Permit me to say - that sig is splendide!! Excellent work! One question: what font did you use in the tutorial? |
|
|
|
|
27th November 2009, 22:46
|
#10 |
|
"""""""""""
Clinically Insane Join Date: Feb 2008
Posts: 3,933
Thanks: 1,738
Thanked 20,134 Times in 3,183 Posts
|
|
|
|
|
|
| Thread Tools | |
|
|


